Keep in mind: that the products are made of elastic materials and fit the figure.

TAKING BODY MEASUREMENT
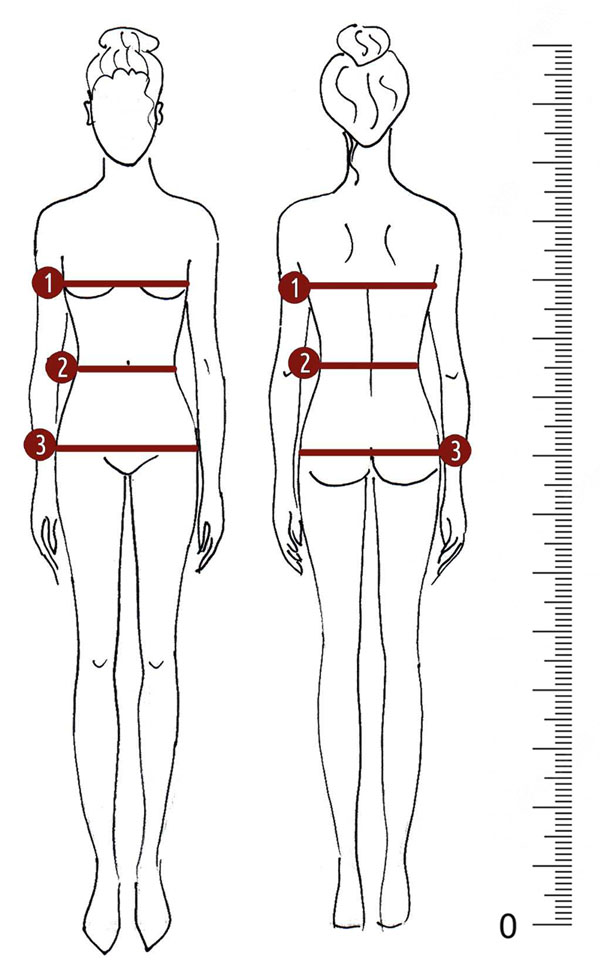
Chest: Measure around the fullest part of the bust, ensuring the tape is level and not too tight.
Wrap the measuring tape around the fullest part of your bust.
Extend the tape across your back, ensuring it’s level and firm.
Slip one finger underneath the tape to allow for ease.
Waist: Measure around the narrowest part of the waist or do the bend test.
Bend to the side to find your natural waist crease.
Wrap the tape measure around your body at this crease.
Place one finger under the tape measure for ease.
Hips: Measure around the widest part of the hips.
Find the widest part of your hips.
Measure around this area, ensuring the tape goes over the fullest part of your buttocks.
Keep the tape measure level and firm around the entire hip area.
Height: The person being measured should stand straight, on both feet, feet some 15 cms apart.
GENERAL GUIDELINES FOR TAKING BODY MEASUREMENTS
It will be perfect if you can wear the lingerie you intend to wear with the final garment while taking the measurements. This is especially important for perfectly fitted clothes. A push-up bra will make all the difference in your final look. Remember that if you intend to wear underwired, padded, push-up, or other figure-altering bras, this should be considered.
Choose a good and accurate tape measure. Keep it level (parallel to the ground) all the time you are taking horizontal measures.
It is best if you can get another person to take the measurements.
The person taking the measurement should be on the right side of the person.
All circumference measurements should be taken with tape measure parallel to the floor and with enough slack in tape to slide one finger under the tape.
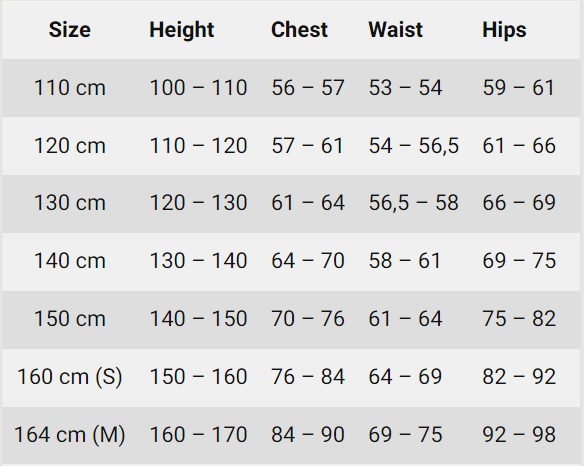
Find your parameters in the dimension table:

| Size | Height | Chest | Waist | Hips |
| 110 cm | 100 – 110 | 56 – 57 | 53 – 54 | 59 – 61 |
| 120 cm | 110 – 120 | 57 – 61 | 54 – 56,5 | 61 – 66 |
| 130 cm | 120 – 130 | 61 – 64 | 56,5 – 58 | 66 – 69 |
| 140 cm | 130 – 140 | 64 – 70 | 58 – 61 | 69 – 75 |
| 150 cm | 140 – 150 | 70 – 76 | 61 – 64 | 75 – 82 |
| 160 cm (S) | 150 – 160 | 76 – 84 | 64 – 69 | 82 – 92 |
| 164 cm (M) | 160 – 170 | 84 – 90 | 69 – 75 | 92 – 98 |
| 170 cm (L) | 170 -175 | 90 – 96 | 75 – 80 | 98 – 104 |

FOOT MEASUREMENT

- CONTOURING YOUR FOOT
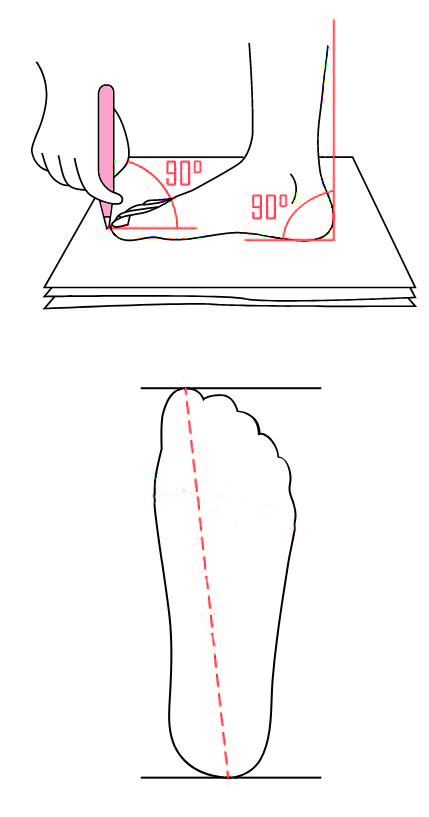
Put on a flat floor clean sheet of paper. The foot must not extend beyond the paper. You sit down on a chair and put next to bet on a clean sheet of his right foot (in a sock or stocking) in such a way that in a sitting position your lower leg was at right angles to the support surface.
Delineation make by a slate pencil or thin rod from the handle. Pencil must touch the foot and be perpendicular to the sheet of paper. Encircle the foot round from the mid-point of the heel’s back, continuing along the inner contour to the end of the thumb. Then, carried out delineation of outer side, from the heel and ending thumb. Thus was produced a closed outer contour of the foot.
- MEASURE LENGTH.
Foot length is measured from the outermost point of the heel to the end of the first or second finger.
To measure your foot is advisable to use a measuring tape with millimeter divisions.
If you have difficulty determining sizes, contact us for a consultation – here

